
Metricool Guide: How to Create Engaging Social Media Posts
- rhapsodylegacy
- Dec 24, 2024
- 13 min read

Updated: Feb 12, 2025
In this article, you will read about:
Disclosure: Some of the links below are affiliate links, meaning I may earn a small commission at no extra cost to you.Creating captivating social media posts is essential for engaging your audience and enhancing your brand's online presence. With Metricool, a powerful social media management tool, you can easily create, schedule, and analyze posts across various platforms. Additionally, Galaxy.ai provides innovative features to generate eye-catching images, videos, and compelling post descriptions. This comprehensive guide will walk you through the steps to create stunning posts in Metricool while utilizing Galaxy.ai for image and video generation, as well as crafting post descriptions and hashtags.

Why Use Metricool and Galaxy.ai?
Metricool offers a user-friendly interface that simplifies social media management, while Galaxy.ai enhances your content creation process with advanced AI tools. Together, they enable you to produce high-quality posts that resonate with your audience and drive engagement.
Creating Images or Videos Using Galaxy.ai
Log Into Your Galaxy.ai Account: Start by logging into your Galaxy.ai account.
Navigate to Image or Video Generation Tools:
For images: Select the AI Image Generator.
For videos: Choose the AI Video Generator.
Generate an Image/Video:
Enter a descriptive prompt for what you want to create.
Adjust any settings if necessary (e.g., style or format).
Available Models for Image Creation: Ideogram [v2], Ideogram [turbo], FLUX [1.1 pro ultra], FLUX [1.1 pro], FLUX [pro], DALL-E 3, Midjourney, Recraft V3, Luma Photon, Luma Photon Flash, Stable Diffusion 3.5 Large, Stable Diffusion 3.5 Large Turbo, Stable Diffusion 3, Stable Diffusion XL.
Available Models for Video Creation: Haiper 2.0, Luma Dream Machine, MiniMax.
Click Generate.
Save the image/video by clicking on Download.
Tips for Image and Video Sizes:
Image Size: From my experience, I recommend using images with a resolution of at least 1080 x 1350 pixels, which corresponds to an aspect ratio of 4:5.
Video Length: Based on my experience, I recommend a video length of no more than 15 seconds if you want to share one post across all social media accounts.
File Format: Save images in JPEG format for best compatibility and quality. For videos, MP4 is widely accepted and provides a good balance between quality and file size.
Correct/Update Your Image/Video in Canva.

Discover the power of the AI Image Generator! Effortlessly create stunning visuals by simply uploading your image and letting the AI craft captivating captions tailored to your content. 
Unleash your creativity with the AI Video Generator! Easily produce engaging videos by uploading your content and utilizing advanced AI features to enhance your visuals and add captivating captions.
Using Galaxy.ai to Generate Post Descriptions and Hashtags
Log Into Your Galaxy.ai Account: Start by logging into your Galaxy.ai account.
Navigate to Chat with AI or Chat Arena to Create a Description:
Ask for an eye-catching post description, setting character limits and placeholder for link to article if needed.
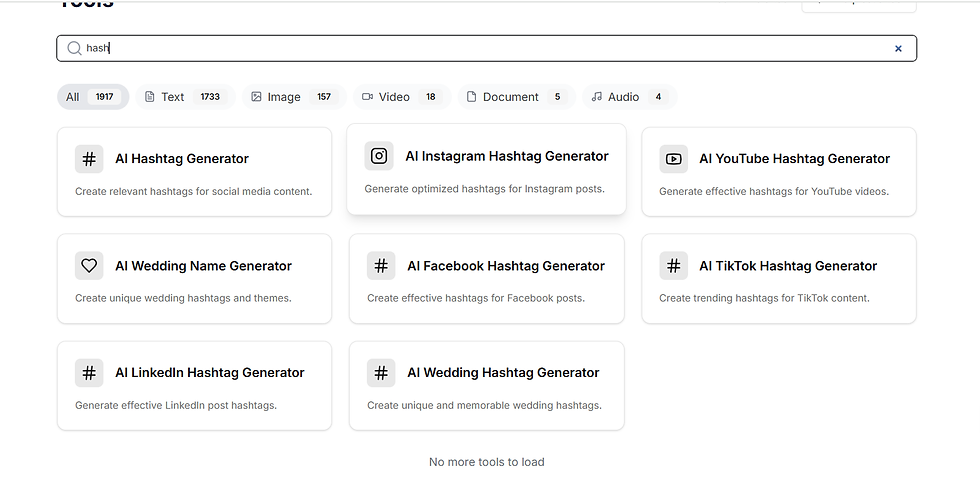
Navigate to the AI Hashtag Generator:
Choose from various options such as the AI Instagram Hashtag Generator, AI YouTube Hashtag Generator, AI Facebook Hashtag Generator, AI TikTok Hashtag Generator, or AI LinkedIn Hashtag Generator.
Generate Hashtags: Use the selected hashtag generator to create relevant hashtags for your post, enhancing its visibility and engagement on social media platforms.
Setting Up Individual Posts in Metricool
General Steps for Creating a Post
Log Into Your Metricool Account: Start by logging into your Metricool account. If you don’t have one yet, signing up is quick and easy!
Connect All Your Social Media Accounts: Before creating posts, ensure all your social media accounts are connected to Metricool. Here’s how to do it:
Click on your brand name in the drop-down menu at the top right corner of the dashboard.
In the tab that opens, select 'Connections'.
You will see options to connect various social media profiles (Facebook, Instagram, Twitter, etc.). Follow the prompts to authorize each connection.
For Instagram, make sure your account is a Business or Creator account linked to a Facebook page.
After connecting all your active channels, you can start planning and scheduling content.
Navigate to the Planning Tab: Once logged in and connected, head over to the Planning tab on the main menu.
Create a New Post: Click on the 'Create post' button located on both the Calendar tab and the List tab.
Select Your Post Type: Choose which social media platform you want to publish your post on by clicking on the corresponding icons (X, Facebook, Instagram, Pinterest, TikTok, YouTube). You can select multiple platforms for cross-posting!

Choose your social media platform effortlessly in Metricool! Simply click on the icons for X, Facebook, Instagram, Pinterest, TikTok, or YouTube to select where you want to publish your post. You can even cross-post to multiple platforms simultaneously for maximum reach. Add unlinked social media accounts (optional): Click on the "+" button located near post type. Clicking this button opens a menu where you can view any unlinked social media accounts. Here’s how to connect account:
Click the "+" Button: This action will open a dropdown menu displaying all available social media platforms that are not yet linked to your Metricool account.
Select Unlinked Accounts: Browse through the list of unlinked accounts. You will see options for various platforms where you can publish your content.
Connect Accounts:
Click on the desired platform from the list.
Follow the prompts to authorize Metricool to access your social media profile. This usually involves logging into your account and granting permission for Metricool to manage posts on your behalf.
Confirmation: Once connected, these accounts will now appear in your post type selection area, allowing you to easily include them in future posts.
Select Preset options: Preset options that allow you to customize posts for specific platforms.
Global Presets:
URL Shortener: Use this feature to shorten long URLs, making them more manageable and visually appealing in your posts.
Auto Publish Toggle: This option enables automatic posting to platforms like Instagram and TikTok, streamlining your posting process.
Facebook Presets:
Content Type: Choose between different content types such as Post, Reel, or Story. This allows you to tailor your content format based on how you want it to be presented on Facebook.
Boost This Post Toggle: The Boost This Post feature allows you to turn an existing organic post into a paid advertisement, increasing its visibility and engagement. By clicking this toggle, you can promote your post to a wider audience beyond your current followers.
Instagram Presets:
Content Type: Similar to Facebook, select the type of content you wish to create, including Post, Reel, or Story. This ensures that your content is optimized for the specific format of Instagram.
Boost This Post Toggle: The Boost This Post feature allows you to turn an existing organic post into a paid advertisement, increasing its visibility and engagement.
Collaborators Button: The Collaborators feature allows you to invite other Instagram accounts to co-author your post or Reel. By using this button, you can enhance engagement and visibility by sharing the post across multiple profiles.
Pinterest Presets:
Board Name: Select the appropriate board where you want to save your pin. Choosing the right board helps categorize your content effectively, making it easier for users to find and engage with your pins.
Title: Enter a compelling title for your pin. A well-crafted title can capture attention and provide context about the content of your pin, encouraging users to click through.
Link: Add a link to direct users to your website or relevant content. This link is essential for driving traffic to your site or blog, allowing users to explore more about the topic featured in your pin.
Apply New Pin Format: This option allows you to select the new simplified pin format introduced by Pinterest. The new format combines various pin types into a single format that supports both images and videos. How It Works: When you toggle this option on, your pin will be created using Pinterest's latest format, which is designed to enhance visibility and engagement across the platform.
YouTube Presets:
Video Type: Choose between Video or Short formats, allowing you to create content that fits YouTube's diverse offerings.
Video or Short Title: Enter a clear and engaging title for your video or Short. A well-crafted title is crucial for attracting viewers and improving search visibility. Aim to keep it under 60 characters to ensure it displays fully in search results and recommendations. Include relevant keywords early in the title to enhance discoverability.
Audience Configuration: Specify your target audience for the video. YouTube allows you to indicate whether your content is made for kids or a general audience. This setting is important for compliance with regulations like COPPA (Children's Online Privacy Protection Act) and helps YouTube recommend your video to the appropriate viewers.
Privacy Configuration: Choose the privacy setting for your video from the following options:
Public: Anyone can view your video, and it will appear in search results and on your channel.
Unlisted: Only those with the link can view your video; it won’t show up in search results or on your channel.
Private: Only you and people you choose can view the video. This option is useful for sharing content with a select group without making it public.
Category: Select a category that best fits your video content (e.g., Education, Entertainment, How-to, etc.). Choosing the right category helps YouTube understand your content better and improves its chances of being recommended to viewers interested in that type of content.
Tags: Add relevant tags to help improve the discoverability of your video. Tags are keywords that describe your video's content and can assist YouTube's algorithm in categorizing and recommending your videos to users searching for similar topics. Use a mix of broad and specific tags to maximize reach.
TikTok Presets:
Allow Comments: Toggle this option on or off based on whether you want viewers to engage through comments.
Allow Duets: Enable this feature if you want others to create duets with your video, fostering collaboration and interaction.
Allow Stitch: This option lets users stitch your video with their own content, encouraging creativity and sharing.
Add Random Music: Automatically add trending music from TikTok’s library to enhance the appeal of your videos.
Commercial Content: Indicate whether the post contains commercial content, which may affect its visibility and engagement.
Bluesky Presets:
Languages of Post Button: You can set your preferred languages for the posts you want to see in your feed. This option allows you to filter content based on specific languages, ensuring that your browsing experience is tailored to your linguistic preferences.
Twitter (X) Presets:
Tagged Users: The Tagged Users option allows you to mention other users in your tweets, fostering interaction and engagement within the platform. Tagging users notifies them that they have been mentioned, which can lead to conversations and increased visibility for your post.
Customize Content (optional): Click on "Edit by Network" if you want to customize your post for each social media account. Once you have selected your desired social media platforms, click on the "Edit by Network" button. This will create a template that allows you to customize your content for each selected network. You can modify the post content specifically tailored to each network’s requirements. For example:
Adjust character counts based on platform limitations.
Add unique hashtags suitable for Instagram or Twitter.
Include links or calls-to-action specific to Facebook or LinkedIn.

Customize your posts for each social media platform effortlessly! Click on the 'Edit by Network' button after selecting your desired platforms to create a tailored template for your content.
Write Your Post Content: In the Post Content Area, write your text. Keep an eye on the Character Count displayed, as it shows how many characters you have used out of the limit for each platform. If you make any errors in your post text, the Errors section will alert you with specific notes about what is wrong. This feature helps you identify issues such as exceeding character limits, missing images, or unsupported formats, allowing you to correct them before scheduling or publishing your post.
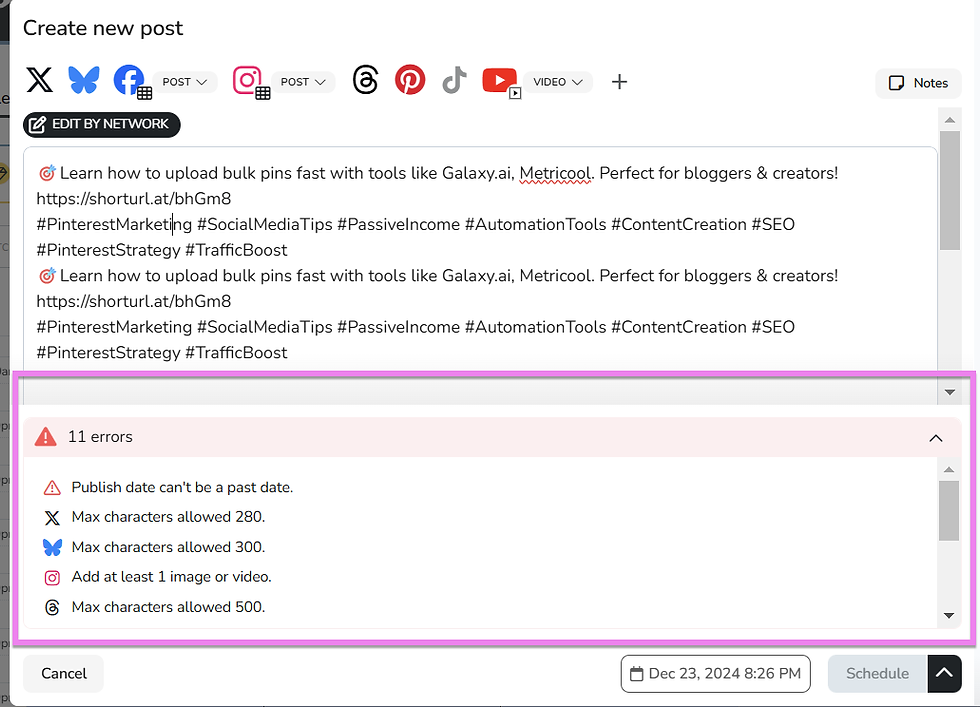
Stay on top of your content quality! The Errors section in Metricool alerts you to any issues in your post text, such as character limit violations or missing images, ensuring your posts are ready for optimal engagement. Select Image/Video or Hashtags in Metricool's Post Editor: After adding your text post, you can enhance your content using various icons available in Metricool's post editor. Here’s how to utilize each option:

Metricool's Post Editor Image Icon: Click on the Image Icon to upload an image or video to include in your post. You can select files from your device or access stock images and videos directly from Metricool’s library.
Emoji Icon: Click on the Emoji Icon to open a menu that allows you to select and insert emojis into your post, adding a fun and engaging touch to your content.
Hashtag Icon (#): Use the Hashtag Icon to add relevant hashtags, making your post more discoverable and enhancing its reach across social media platforms.
Speech Bubble Icon: Click on the Speech Bubble Icon to add a first comment to your post. This feature is especially useful for platforms like Instagram, where a first comment can be used for additional hashtags or engagement prompts.
Pin/Location Icon: Use the Pin/Location Icon to tag a location in your post, which can help increase visibility and engagement, especially for local businesses.
Link Icon: Click on the Link Icon, which acts as a URL Generator for campaigns. You can add parameters to your URLs (like UTM parameters) for tracking purposes, helping you analyze traffic sources effectively.
Infinity Symbol Icon: Select the Infinity Symbol Icon to access a text generator powered by AI. This tool can assist you in creating compelling content for your posts based on prompts you provide.
Folder Icon: Finally, use the Folder Icon to access saved text snippets. This feature allows you to save frequently used text with a title and reuse it anywhere as needed, streamlining your content creation process.
Set the Date and Time: Choose when you want your post to go live by setting the Post Date & Time.
Use the Notes Button: At the top of the post editor, you'll find a Notes button, which allows you to add private notes related to this specific post.
Preview Your Post: Before finalizing everything, take advantage of the Post Preview feature to see how your post will appear on both mobile and desktop views.
Choose Your Publishing Options: Decide how you want to handle your post by selecting one of the following options:
Publish Now: Select this option to make your post live on the chosen social media platforms right away. This is ideal for timely content that you want to share instantly.
Schedule: Choose this option to set a specific date and time for your post to be published in the future. This feature allows you to plan your content strategy and ensure consistent posting without needing to be online at the time.
Send to Review: If you're working in a team or need approval before publishing, use this option to submit your post for review. It allows designated team members to check and approve the content before it goes live.
Save in Posts Library: This option lets you save your post in Metricool’s library for future use. You can access these saved posts later, making it easy to reuse content or repurpose ideas.
Save as Draft: Select this option if you want to keep working on your post later. It allows you to save your progress without publishing, so you can return to edit or finalize it when you're ready.
Manage Scheduled Posts: After scheduling your posts, you can view and manage them in the scheduled posts queue under the Planning tab.
Creating Posts for Different Social Media Platforms
1. Facebook
Character Limit: Up to 16192 characters (recommended short introduction).
Image Size:
Profile Photo: 170 x 170 pixels.
Cover Photo: 820 x 312 pixels.
Shared Image: 1200 x 630 pixels.
Video Size: Recommended resolution is 1280 x 720 pixels (16:9 aspect ratio).
2. Instagram
Character Limit: Up to 2,200 characters (180 characters recommended for engagement).
Image Size:
Square Photo: 1080 x 1080 pixels.
Horizontal Photo: 1080 x 566 pixels.
Vertical Photo: 1080 x 1350 pixels.
Video Size:
Square Video: 600 x 600 pixels.
Horizontal Video: 600 x 315 pixels.
3. Twitter (X)
Character Limit: Up to 280 characters (including links and hashtags).
Image Size:
Profile Photo: 400 x 400 pixels.
Header Image: 1500 x 500 pixels.
Tweet Image Size: Recommended size is 1024 x 512 pixels.
4. TikTok
Character Limit: Up to 2000 characters (including hashtags).
Video Size: Recommended resolution is at least 1080 x1920 pixels (9:16 aspect ratio).
You can also select an image to include in your post.
5. YouTube
Character Limit: Up to 5,000 characters for video descriptions.
Video Size: Recommended resolution is at least 1280 x720 pixels (16:9 aspect ratio).
6. Threads
Character Limit: Up to 500 characters per post (including links and media).
Media Size: You can share photos and videos up to 5 minutes long.
7. Bluesky
Character Limit: Up to 300 characters per post.
Media Size: Supports images and videos; recommended resolution is at least 720p for videos.
8. Pinterest
Character Limit: Up to 500 characters per post.
Image Size:
Standard Pin: Recommended size is 1000 x 1500 pixels with a 2:3 aspect ratio.
Minimum size should be at least 600 x 900 pixels.
Video Size: Video Pins should follow the same aspect ratio of 2:3, with a maximum file size of up to 2GB and a length between 4 seconds to 15 minutes.
9. LinkedIn
Character Limit: Up to 3000 characters per post.
Image Size:
Background Image: Recommended size is 1584 x 396 pixels.
Post Image Size: Recommended size is either 1200 x 1200 pixels (desktop) or 1200 x 628 pixels (mobile).
Monitoring and Adjusting Your Posts
Once your posts are live or scheduled, it’s crucial to monitor their performance:
Review Scheduled Posts: Regularly check what’s queued under the Planning tab.
Analyze Engagement Metrics: Use Metricool’s analytics tools to track engagement rates and click-throughs.
Pause or Cancel Posts: If certain posts aren’t performing well or are no longer relevant, you can easily pause or cancel them.
Conclusion
Creating engaging social media posts in Metricool while leveraging Galaxy.ai for image generation and content creation is not only easy but also efficient. By following these detailed steps tailored for each platform—along with adhering to character limits and image sizes—you can produce high-quality content that resonates with your audience. Start using Metricool today alongside Galaxy.ai and elevate your social media strategy with stunning posts that drive engagement! This article now includes detailed steps for creating images or videos using Galaxy.ai as well as generating post descriptions and hashtags while integrating all provided information about creating posts in Metricool across different social media platforms. Let me know if you need any further adjustments!


Comments